10 Building the App with {golem}
Now that the application is prototyped inside a golem (Fay, Guyader, Rochette, et al. 2023) skeleton, you can work on its integration. In this step of the workflow, you will be linking the back-end and front-end together, and working on the global engineering of the application:
- add and organize dependencies
- create and include sub-modules if necessary
- organize utility functions and link them to the module in which they are used
- add testing infrastructure
- link to CI/CD services
Note that some concepts introduced here will be more extensively explored in the following chapters: the present chapter is a walkthrough of what you will find inside the 02_dev scripts.
10.1 Add dependencies
10.1.1 Package dependencies
When you are building a shiny (Chang et al. 2022) application, you will have to deal with dependencies. Well, at least with one dependency, shiny. But chances are that you will not only be using shiny inside your application: you will probably call functions from other packages, for example, from ggplot2 (Wickham, Chang, et al. 2023) for plotting, or any other package that is necessary for your application to work.
If you are building your application using golem, you will have 3 default dependencies: golem itself, shiny, and config.
If you call golem::use_recommended_deps() in the first workflow script, you will also have shiny, DT, attempt, glue, htmltools, and golem as dependencies to your package.39
But what about other dependencies like ggplot2? These ones need to be added by hand.
Here is how to process for a new dependency:
- Open the
dev/02_dev.Rscript. - Call the
use_package()function from usethis:usethis::use_package("pkg.you.want.to.add"). - Detail import mechanism in the related R files.
10.1.2 Importing packages and functions
There are two places where the dependencies of your application need to be managed:40 the DESCRIPTION file and the NAMESPACE file.
The
DESCRIPTIONfile dictates which packages have to be installed when your application is installed. For example, when you install golem on your machine, you will also need other packages that are internally used by golem. And your application will also have dependencies: at the very least shiny, golem, and config. When building your application, you have to list these requirements somewhere, and the standard way to do that is by using theDESCRIPTIONfile.41The
NAMESPACEfile describes how your app interacts with the R session at run time, i.e. when your application is launched. With thisNAMESPACEfile, you can specify only a subset of functions to import from other packages: for example, you can choose to import onlyrenderDT()andDTOutput()from DT, instead of importing all the functions. This selective import mechanism allows you to avoid namespace conflicts: for example, betweenjsonlite::flatten()andpurrr::flatten().42 To do so, we will need to go to every script that defines one or several function/s, and add a roxygen2 (Wickham, Danenberg, et al. 2022) tag, in the following form :#' @importFrom jsonlite fromJSONand#' @importFrom purrr flatten: that way, you are only importingfromJSON()from jsonlite.
Note that you can also use explicit namespacing, i.e. the pkg::function() notation inside your code.
And if you need a little help to identify dependencies, all the explicitly namespaced calls (pkg::function()) can be scraped using the attachment (Rochette and Guyader 2023) package:
# This function will read all the scripts in the R/ folder and
# try to guess required dependencies
attachment::att_from_rscripts()
If you are using a development package (for example, one installed from GitHub), you can add it to the DESCRIPTION using the use_dev_package() function from usethis.
This will add another field to the DESCRIPTION file, Remotes, with the location where the package is available.
All of this can seem a little bit daunting at first, but that is for the best:
Having a high quality namespace helps encapsulate your package and makes it self-contained. This ensures that other packages won’t interfere with your code, that your code won’t interfere with other packages, and that your package works regardless of the environment in which it’s run.
R Packages (Wickham and Bryan 2020)
To learn more about the details of how to manage dependencies, and about the DESCRIPTION and NAMESPACE files, here are some resources:
- Writing R Extensions, the official manual from the R-Core team
- R Packages, especially the Package metadata and Namespace chapters
10.2 Submodules and utility functions
When building a large application, you will be splitting your codebase into smaller pieces.
In Chapter 3, “Structuring Your Project”, that these utilitarian functions should be defined in files that are prefixed with a specific term.
In the golem world, these are utils_* and fct_* files:
-
utils_*files contain small functions that might be used several times in the application. -
fct_*files contain larger functions that are more central to the application.
Two functions can be called to create these files:
# Adding fct_ and utils_ files to the project
golem::add_fct( "helpers" )
golem::add_utils( "helpers" )- The first will create a
R/fct_helpers.Rfile. - The second will create a
R/utils_helpers.Rfile.
The idea, as explained before, is that as soon as you open a golem-based project, you are able to identify what the files contain, without having to open them.43
For example, the hexmake app has two of these files, R/utils_ui.R and R/utils_server.R, in which you will find small functions that are reused throughout the app.
The fct_* files are to be used with larger functions, which are more central to the application, but that might not fit into a specific module.
For example, in hexmake, you will find R/fct_mongo.R, which is used to handle all the things related to connecting and interacting with the Mongodb database.
As you can see, the difference is that fct_* file are more “topic centered”, in the sense that they gather functions that relate to a specific feature of the application (here, the database), while utils_* files are more used as a place to put miscellaneous functions.
Note that when building a module with golem::add_module(), you can add a module-specific fct_* or utils_* file:
# Creating the fct_ and utils_ file along the module creation
golem::add_module(
    name = "rendering",
    fct = "connect",
    utils = "wrapper"
)
Will create:
R/mod_rendering.RR/mod_rendering_fct_connect.RR/mod_rendering_utils_wrapper.R
And this can also be done the other way around, by specifying the module you want to link your file to:
# Linking the utils_wrapper file to the rendering module
golem::add_utils("wrapper", module = "rendering")
10.3 Add tests
No piece of software should go into production if it has not been sufficiently tested.
In this part of the building process, you will be setting tests for the application you are building.
We will get back to the how, why and what of testing in an upcoming chapter, but as we are currently going through the 02_dev.R script, we mention here the line that allows you to add a test skeleton to your app.
If you have followed every step from the 01_start.R file, you already have a full testing infrastructure ready, with a set of recommended tests inserted by golem.
But as it is hard to find tests that are relevant to all applications (as every application is unique), you will have to add and manually fill the tests that will check your app.
And right now, to add a new testing file, you can call:
# Generate the testing infrastructure
usethis::use_test("app")
More on testing in Chapter 11.
10.4 Documentation and code coverage
10.4.1 Vignette
Vignettes are the long-format documentation for your application: users see this documentation when they are running browseVignettes(), when they look at the documentation in the Help pane from RStudio, or when they are browsing a web page on CRAN, and they are also the files that are used when the pkgdown websites are built.
The good news is that if you have been using our “Rmd first” method, you already have most of the Vignettes built: they are the Markdown files describing how the back-end of your application works.
Depending on how you applied this principle, these Rmd files might live inside the inst/ folder, or already as package Vignettes.
If you need to add a new Vignette, be it for adding an Rmd describing the back-end or a global documentation about the application, you can call the use_vignette() function from usethis.
# Adding a new Vignette named "shinyexample"
usethis::use_vignette("shinyexample")
Then, you can build all the Vignettes with:
# Compiling the Vignettes
devtools::build_vignettes()
10.4.2 Code coverage and continuous integration
A. Code coverage
Code coverage is a way to detect the volume of code that is covered by unit testing. You can do this locally, or you can use online services like Appveyor, an online platform that computes and tracks the code coverage of your repository.
To add it to your application, call the use_coverage() function from the usethis package:
# Adding the correct code coverage
# infrastructure in your application
usethis::use_coverage()
At the time of writing these lines, this function supports two services: CodeCov and coveralls.
Note that you can also perform code coverage locally, using the covr (Hester 2023) package, and the package_coverage() function.
# Compute the code coverage of your application
code_coverage <- covr::package_coverage()
For example, Figure 10.1 is the output of running the package_coverage() function on the golem package on the 2020-04-29 on the dev branch:
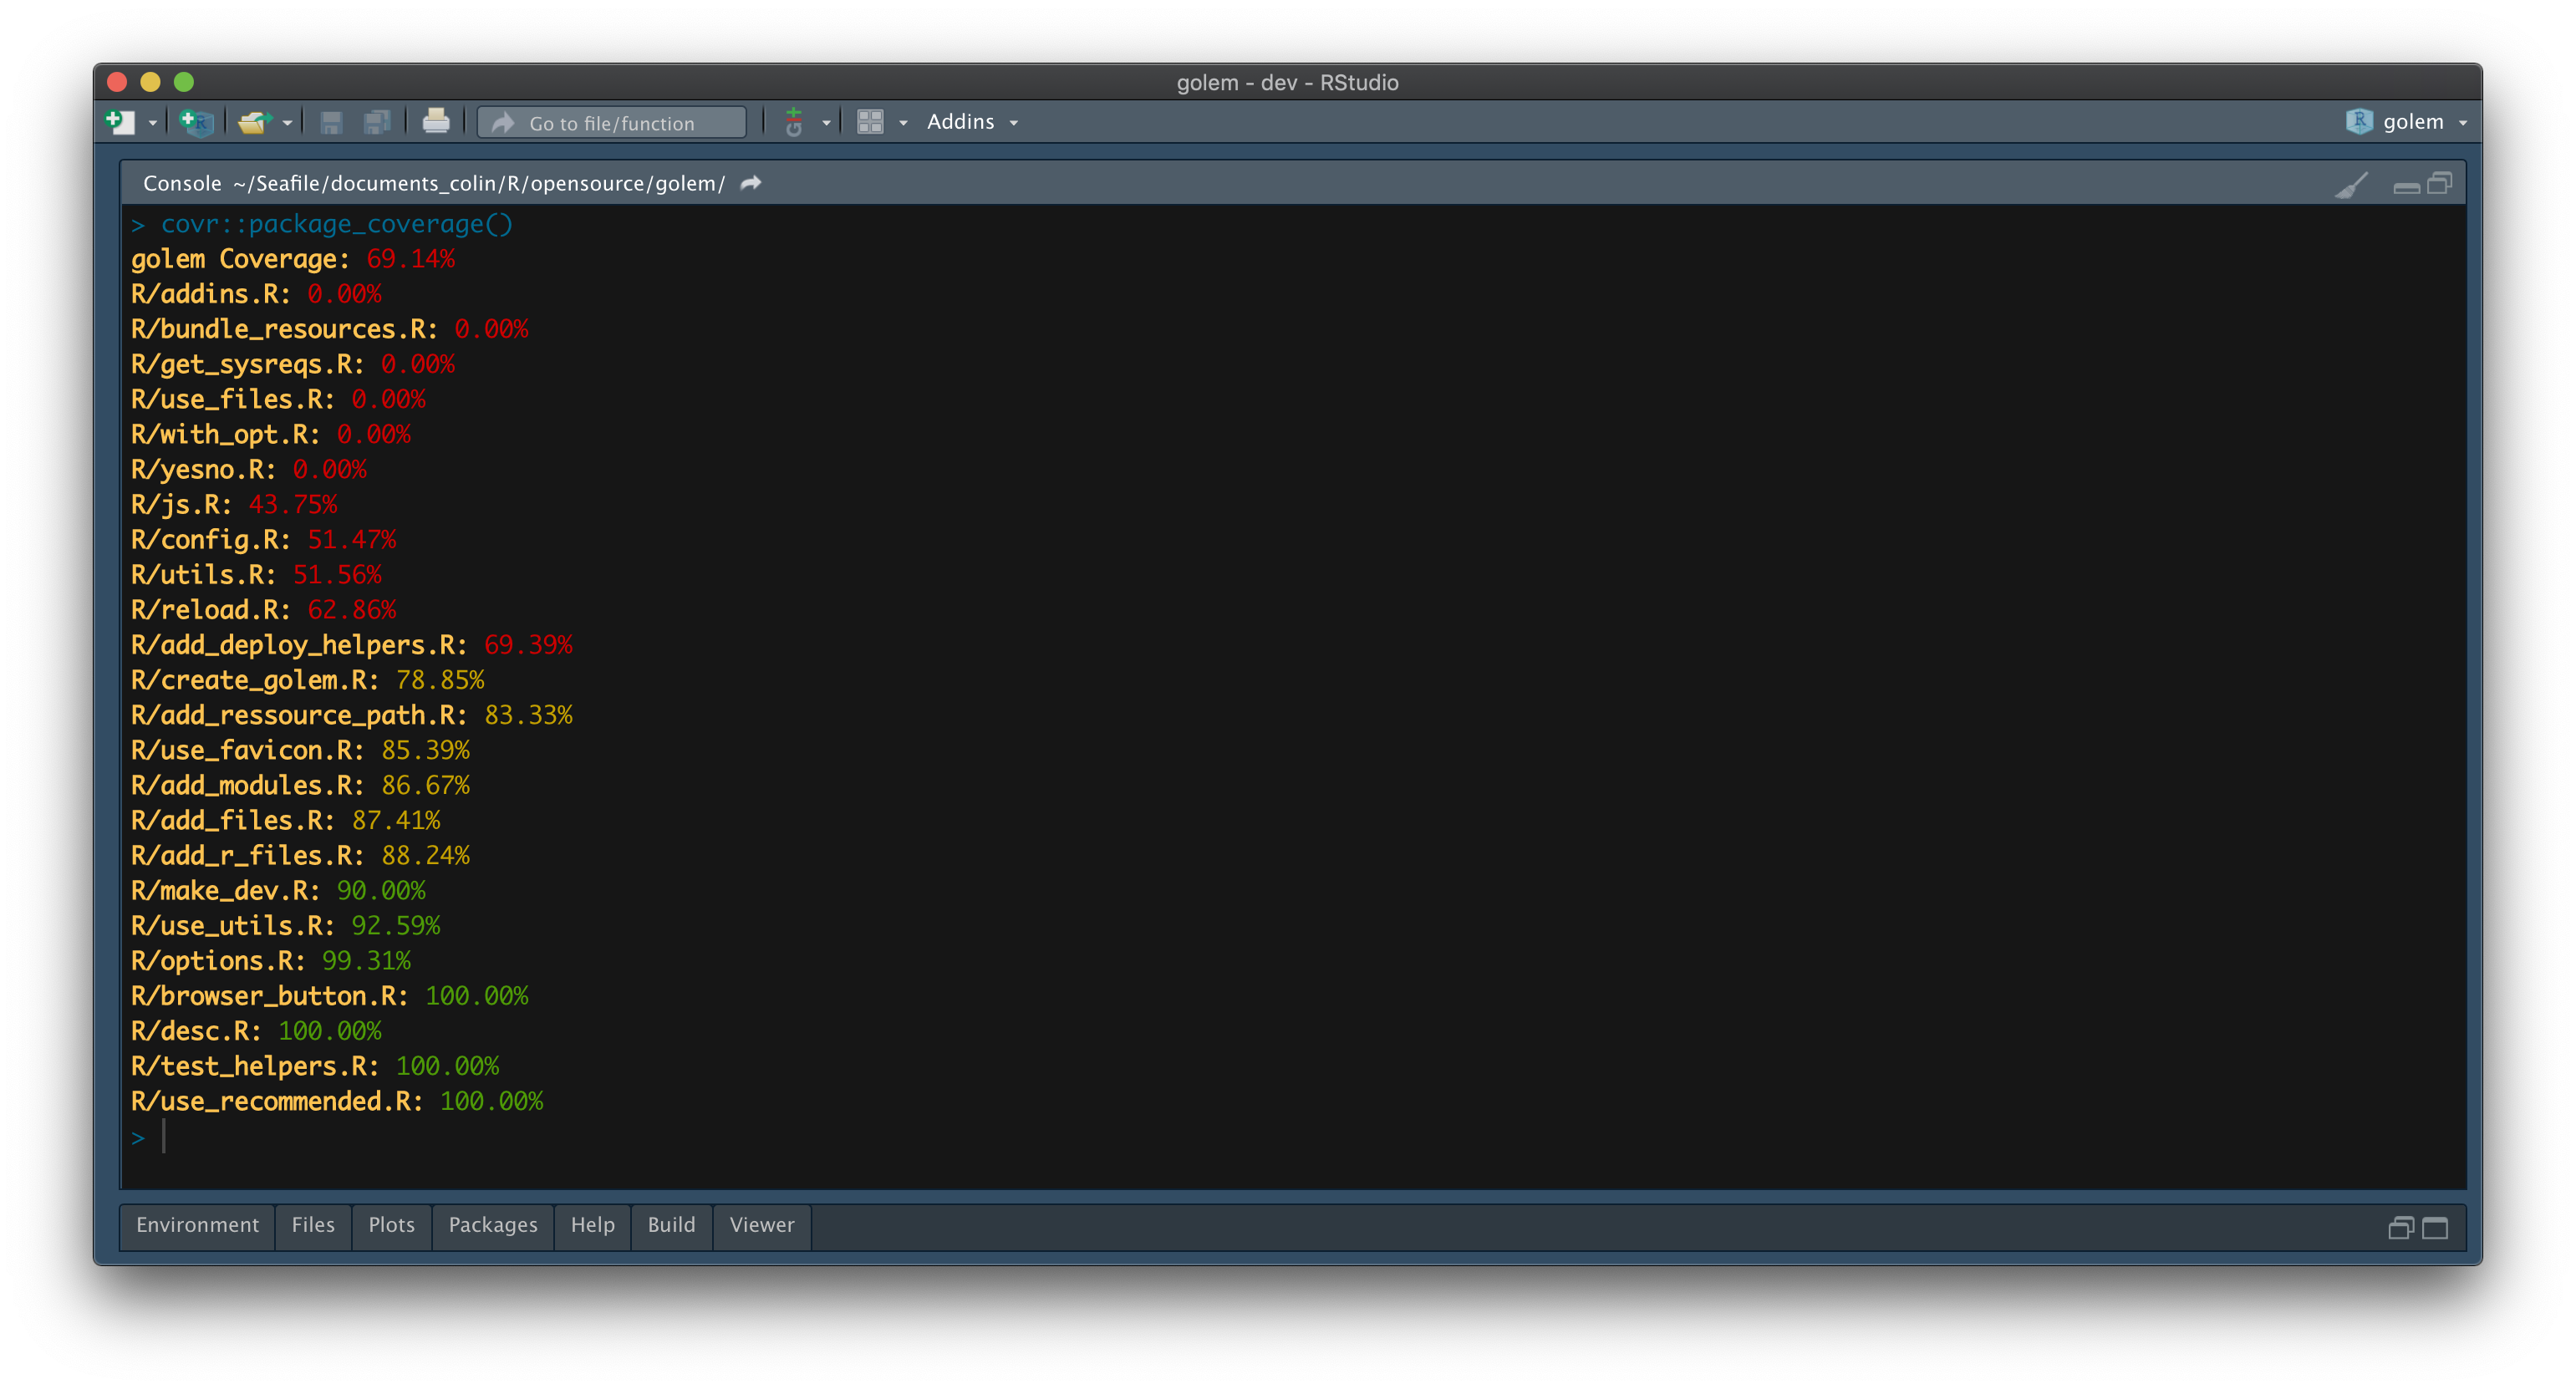
FIGURE 10.1: {golem} code coverage results.
As you can see, we reach a code coverage of almost 70%.
Deciding what the perfect percentage of coverage should be is not an easy task, and setting for an arbitrary coverage is not a smart move either, as it very much depends on the type of project you are working on.
For example, in golem, the addins.R file is not tested (0% code coverage), and that is for a good reason: these addins are linked to RStudio and are not meant to be tested/used in a non-interactive environment, and (at least at the time of writing these lines) there is no automated way to test for RStudio addins.
Another thing to keep in mind while computing code coverage is that it counts the number of lines that are run when the tests are run, which means that if you write your whole function on one single line, you will have 100% code coverage.
Another example is writing your if/else statement on one line if (this) that else that: your code coverage will count this line as covered, even if your test suite only runs the if(this) and not the else; in other words, even if your code coverage is good here, you are still not testing this algorithm extensively.
Note that you can also identify files with zero code coverage using the covr::zero_coverage(covr::package_coverage()) function, which, instead of printing back a metric of coverage for each file, will point to all the lines that are not covered by tests inside your package, as shown in Figure 10.2.
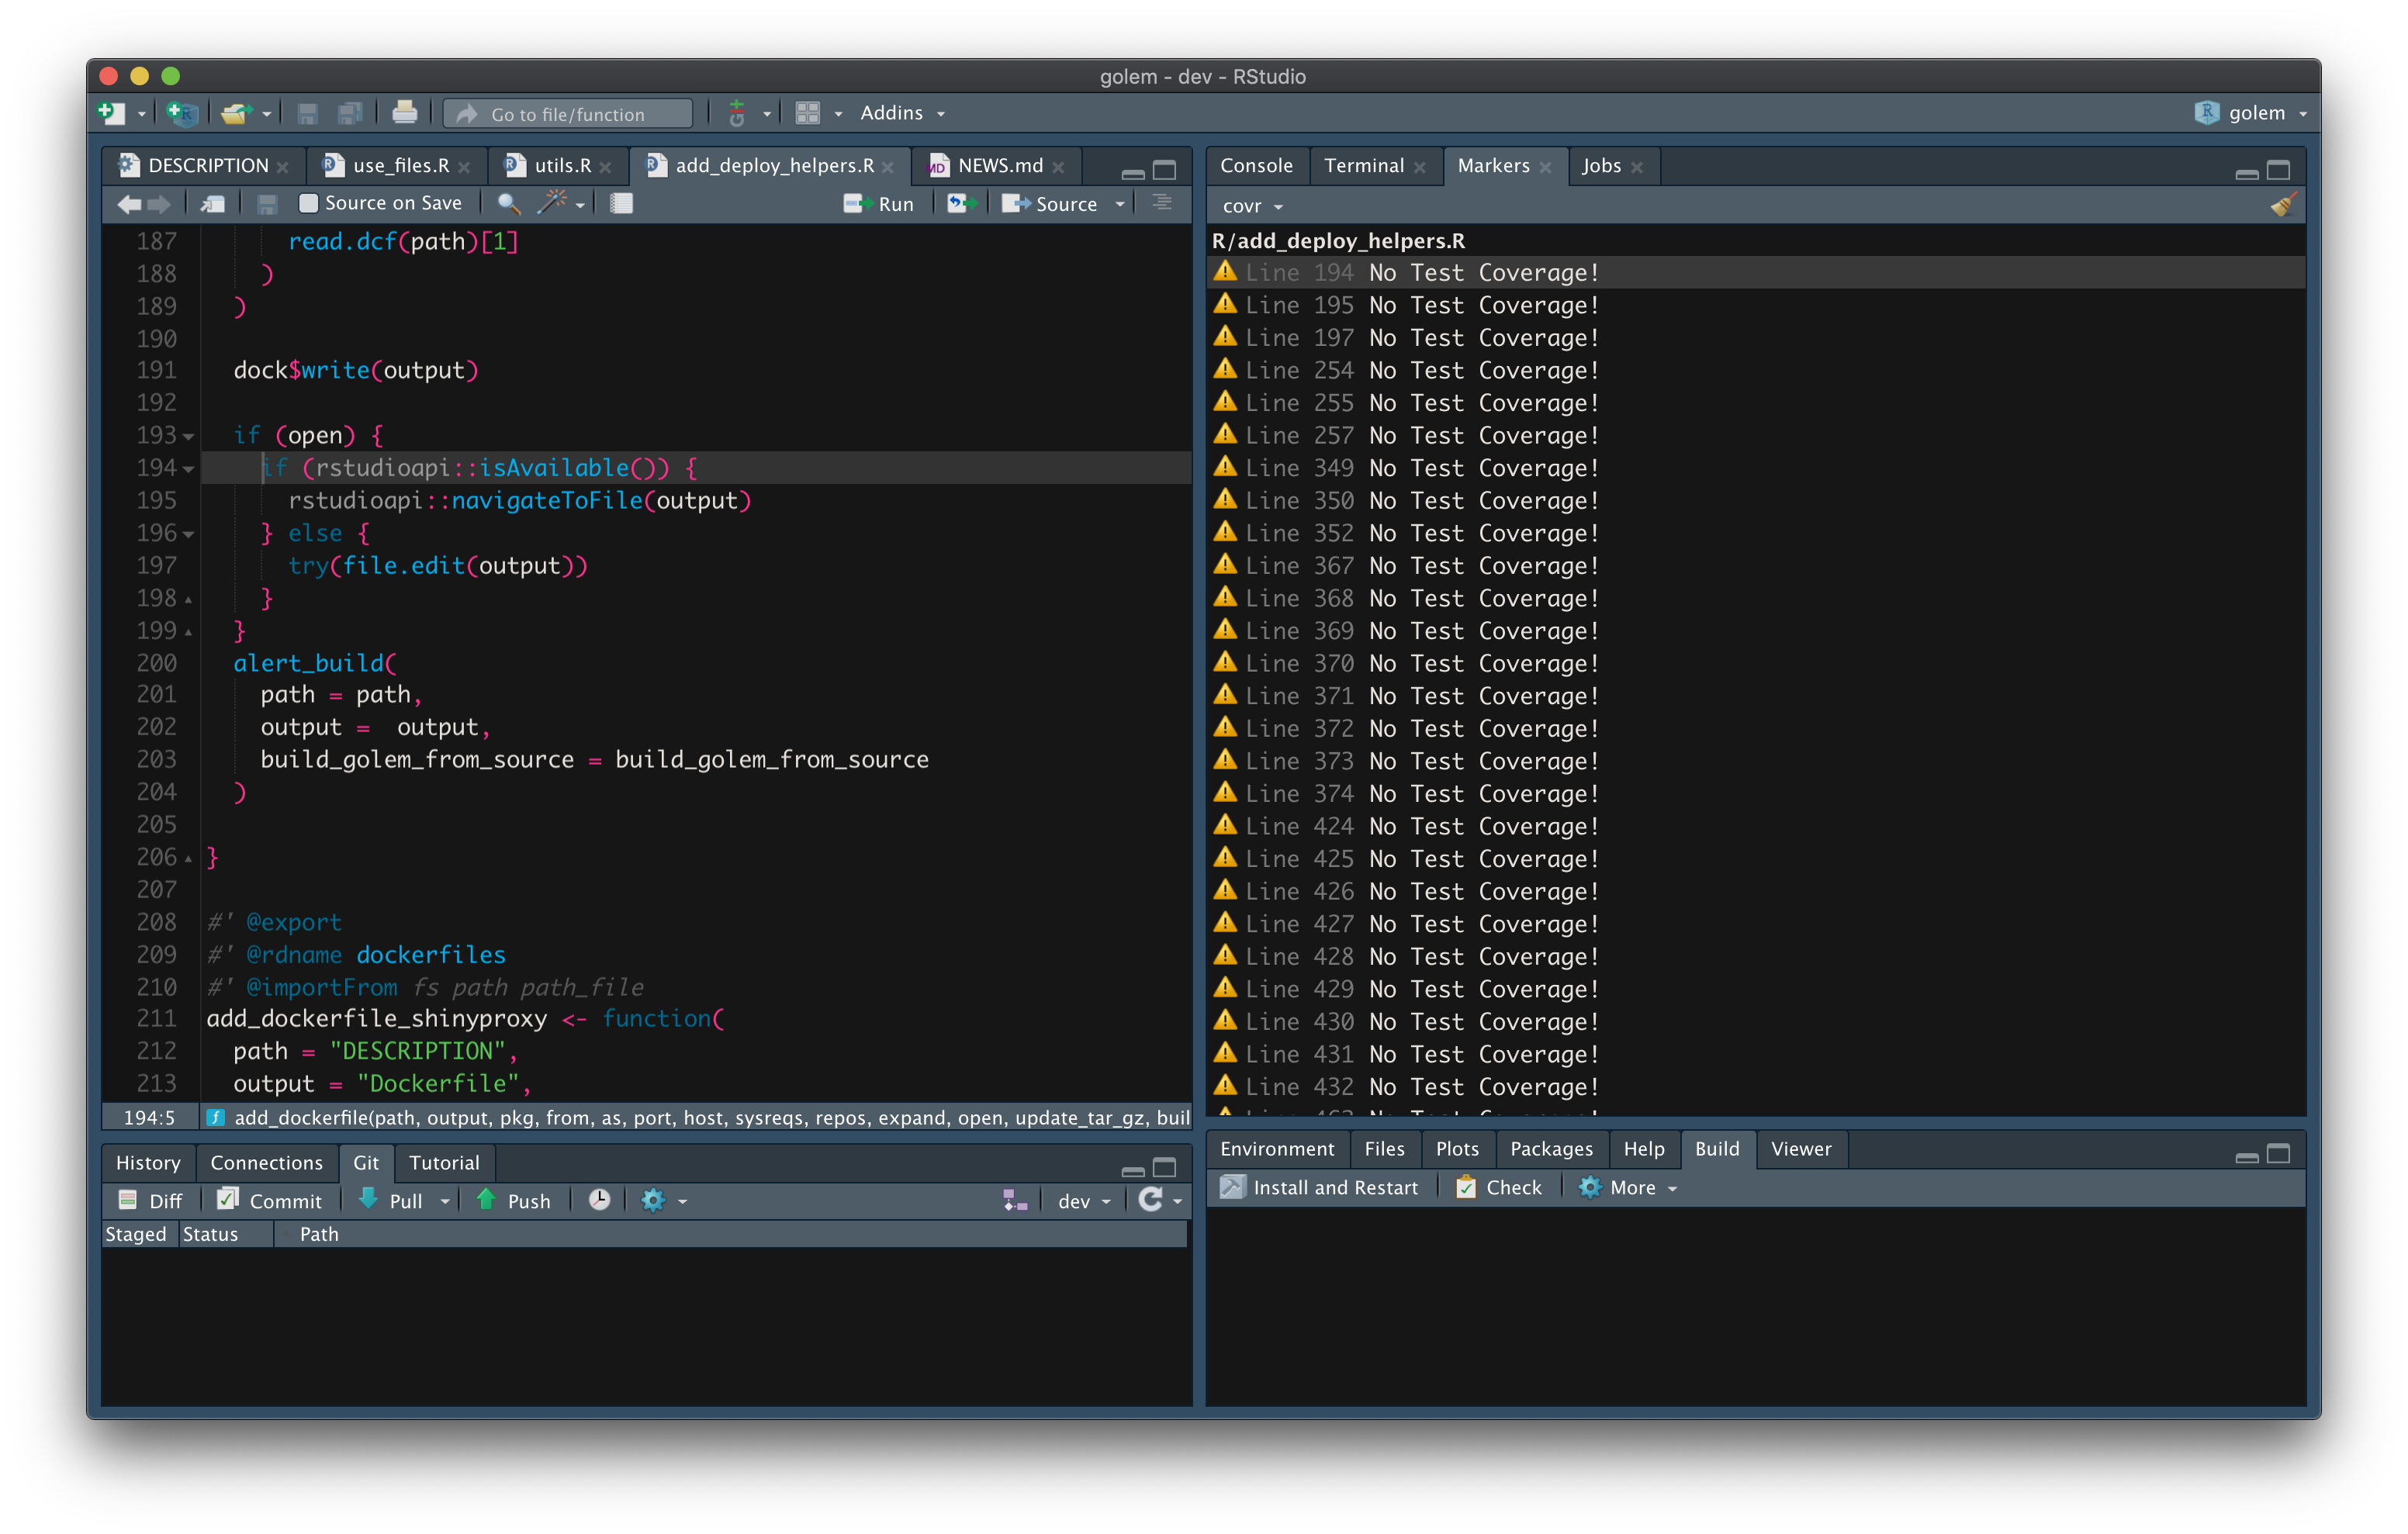
FIGURE 10.2: {golem} files with zero code coverage.
To sum up: do not set an arbitrary code coverage percentage goal, but rather use it as a general metric throughout your project. With CodeCov, you can get a timeline of the evolution of code coverage: a good tool for judging when you need to write more tests. For example, Figure 10.3 is the general tendency for the code coverage of the tibble package over the last 6 months (November 2019 to April 2020):
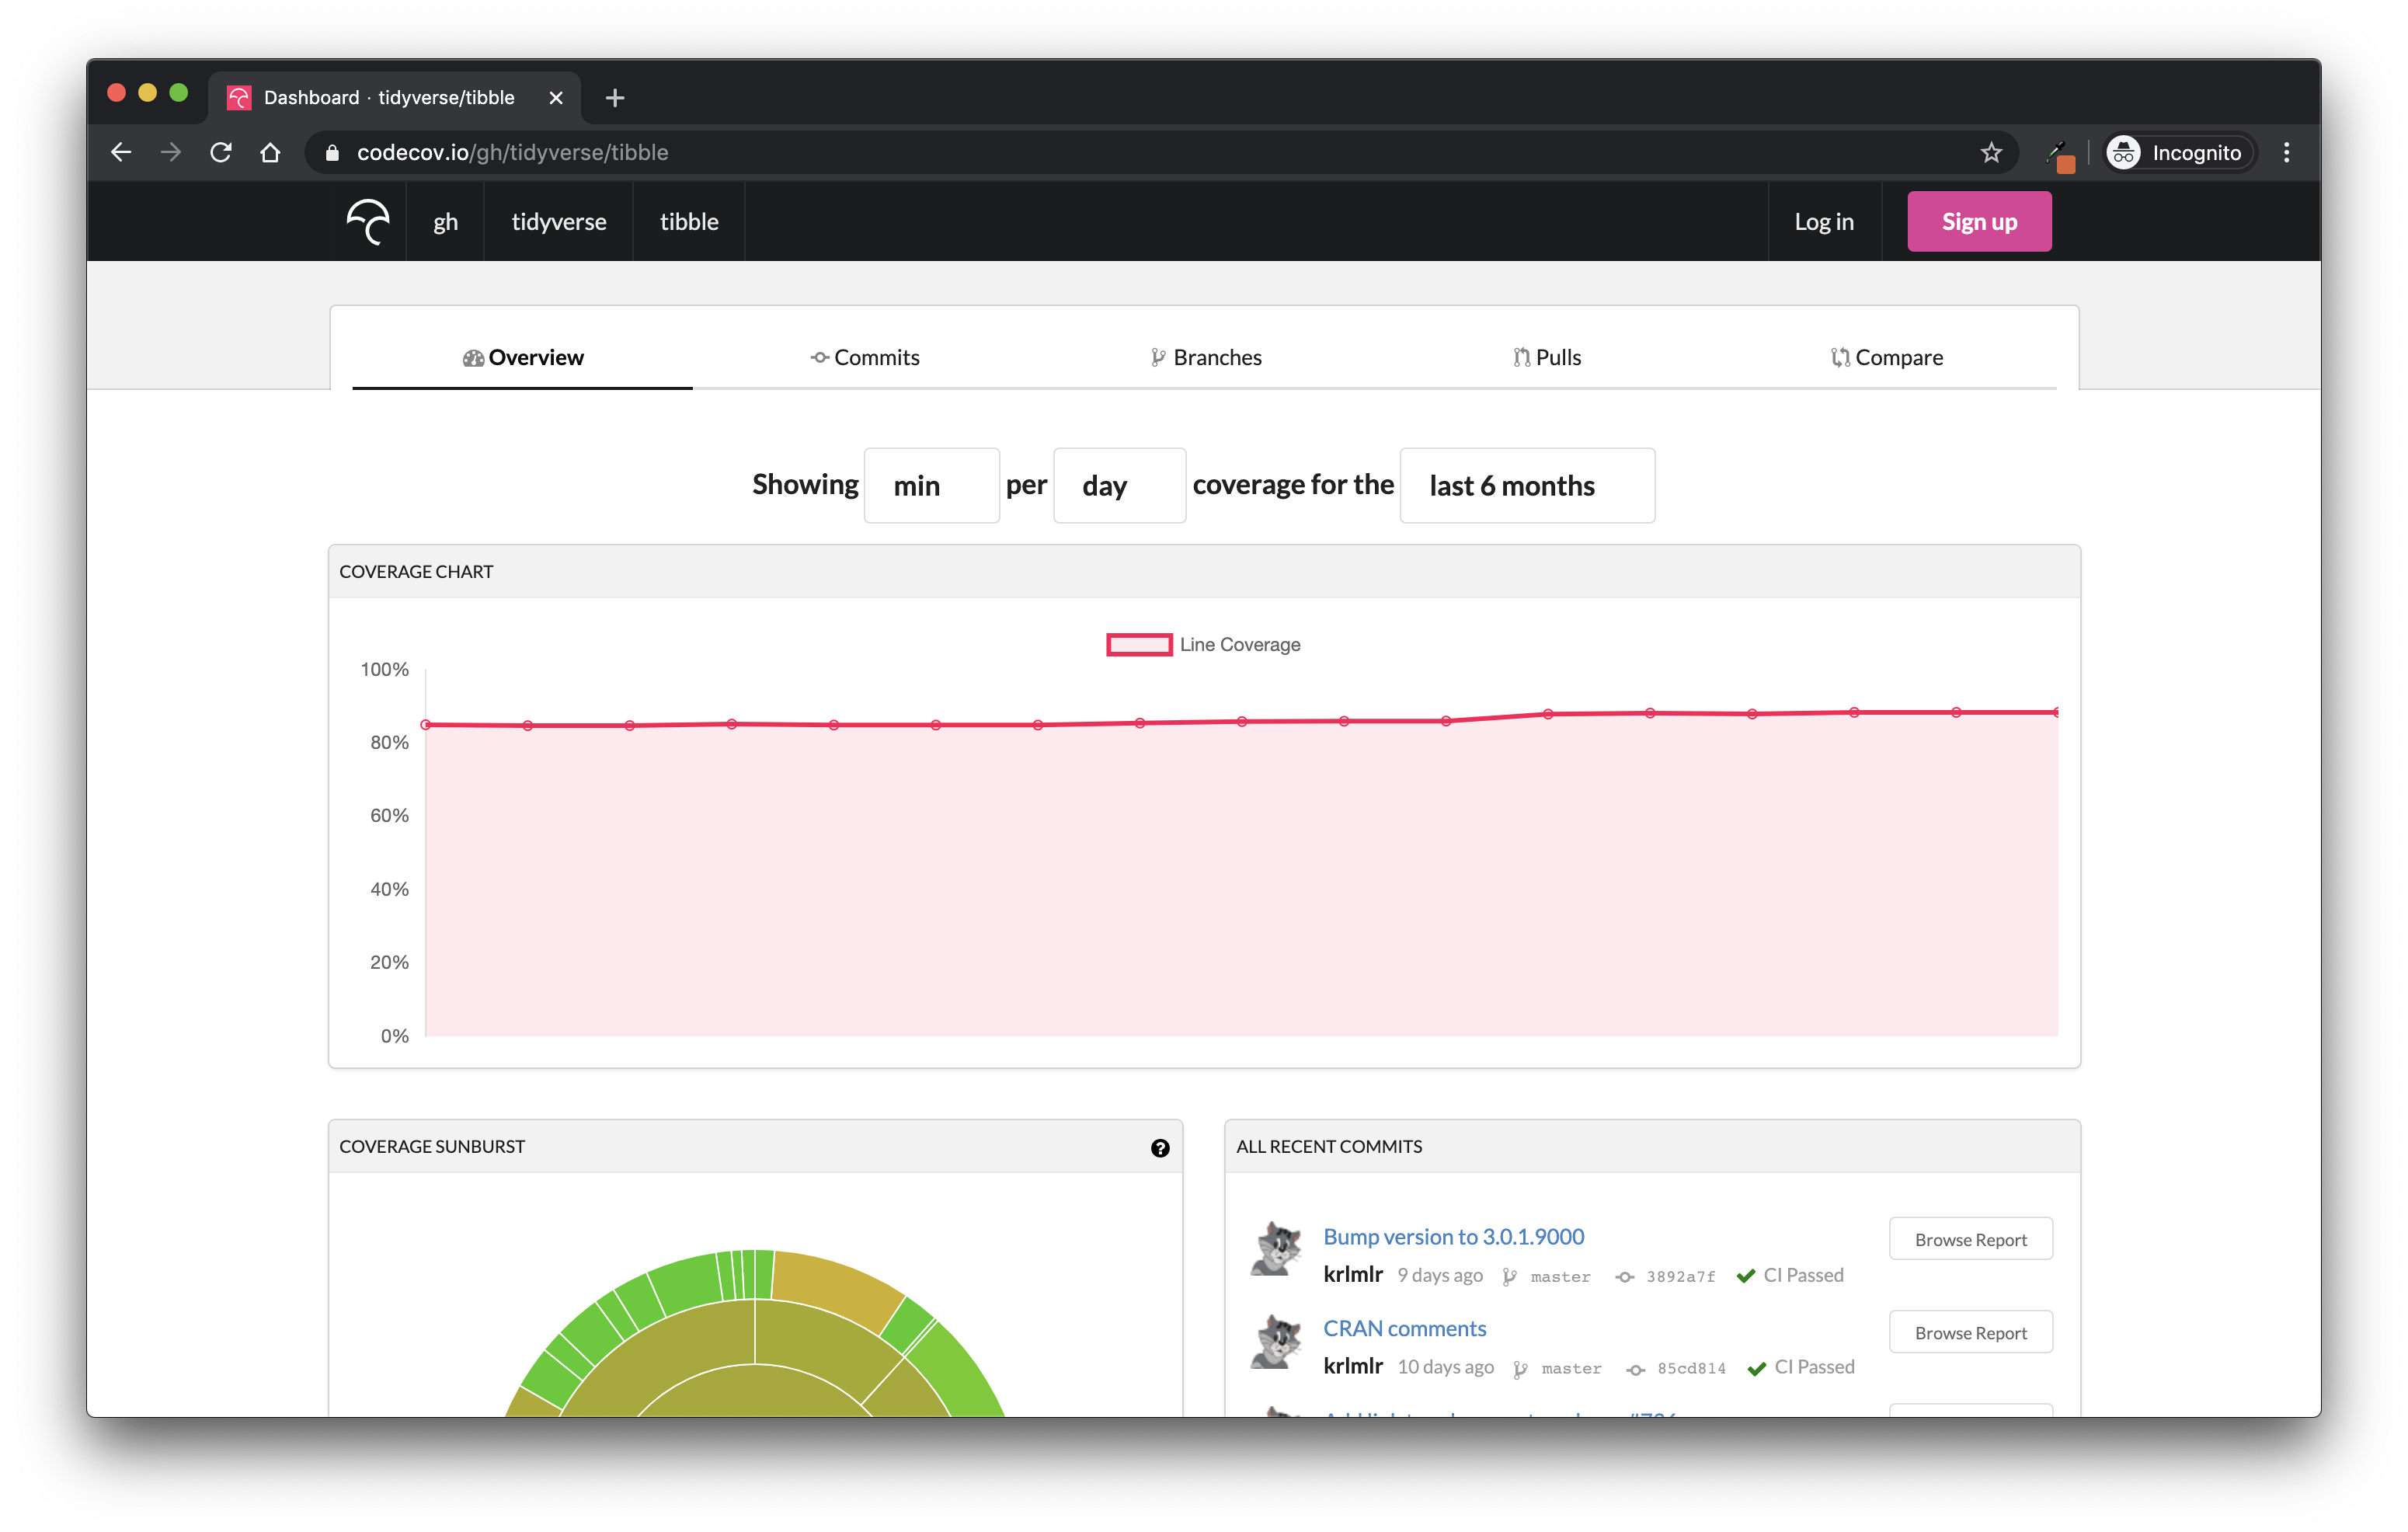
FIGURE 10.3: CodeCov.io results for the {tibble} package.
Perfect for getting a general feeling about the code coverage during the life of the project!
Note also that if you want to add the code coverage of your application inside a Vignette, you can use the covrpage (Sidi 2023) package, which bundles the results of the covr coverage report into an interactive, human-readable Vignette that you can use later on as package documentation, or as an article inside your package website.
covrpage can be installed from GitHub with remotes::install_github('yonicd/covrpage').
B. Continuous Integration
Continuous integration, on the other hand, is ensuring the software is still working whenever a change is made by one of the developers. The idea is to add to the centralized version control system (for example, Git)44 a service like Travis CI, GitHub Action (if you are on GitHub), or GitLab CI (for GitLab) that runs a series of commands whenever something is integrated in the repository, i.e. every time a change to the codebase is made. In other words, every time a new piece of code is sent to the central repository, a service runs regression tests that check that the software is still in a valid, working state.
You can set up various continuous integration services automatically by using functions from the usethis package:
- Travis CI is set up with
usethis::use_travis(). - AppVeyor with
usethis::use_appveyor(). - GitLab CI with
use_gitlab_ci(). - Circle CI with
use_circleci(). - GitHub Actions with
use_github_actions(). - Jenkins with
use_jenkins().
If ever you want to add badges to your README files for these services, usethis also comes with a series of functions to do just that: use_travis_badge(), use_appveyor_badge(), use_circleci_badge() and use_github_actions_badge().
CI services can do a lot more, like for example, deploy the application, build a container and send it to a container registry, compile RMarkdown files, etc.45 The possibilities are almost limitless!
10.5 Using {golem} dev functions
When building an application, you will want it to behave differently depending on where it is run, and notably, if it is run in development or in production.
We have seen in previous chapters that you can use the golem-config.yml file, or pass arguments to run_app().
A third option is to use the dev functions from golem.
There is a series of tools to make your app behave differently whether it is in “dev” or “prod” mode.
Notably, the app_prod() and app_dev() functions look for the value of options( "golem.app.prod" ), or return TRUE if this option does not exist.
In other words, by setting options( "golem.app.prod" ) to TRUE, you will make the functions that depend on this option behave in a specific way.
Some functions pre-exist in golem, for example if you need to print a message to the console only during dev, you can do it with cat_dev().
# Setting the option to FALSE
options( "golem.app.prod" = FALSE)
# Function runs as expected
golem::cat_dev("In dev\n")
In dev
# Switching the option to TRUE
options( "golem.app.prod" = TRUE)
# Nothing is printing
golem::cat_dev("In dev\n")
Of course, chances are you do not only need to print things, you might want to use other functions.
Good news!
You can make any function being “dev-dependent” with the make_dev() function:
# Same mechanism as cat_dev, but with other functions
log_dev <- golem::make_dev(log)
options( "golem.app.prod" = FALSE)
log_dev(10)
[1] 2.303
options( "golem.app.prod" = TRUE)
log_dev(10)
That way, you can use functions in your back-end for development purposes, that will be ignored in production.