12 Version Control
12.1 Using version control with Git
“Friends do not let friends work on a coding project without version control.” You might have heard this before, without really considering what this means.
Or maybe you are convinced about this saying, but have not had the opportunity to use Git, GitHub or GitLab for versioning your applications.
If so, now is the time to update your workflow!
12.1.1 Why version control?
Have you ever experienced a piece of code disappearing? Or the unsolvable problem of integrating changes when several people have been working on the same piece of code? Or the inability to find something you have written a while back?
If so, you might have been missing version control (also shortened as VC).
In this chapter, we’ll be focusing on Git, but you should be aware that other VC systems exist.
As they are less popular than Git, we will not cover them here.
Git was designed to handle collaboration on code projects 48 where potentially a lot of people have to interact and make changes to the codebase.
Git might feel a little bit daunting at first, and even seasoned developers still misuse it, or do not understand it completely, but getting at ease with the basics will significantly improve the way you build software, so do not give up: the benefits from learning it really outweigh the (apparent) complexity.
There are many advantages to VC, including:
You can go back in time. With a VC system like
Git, every change is recorded (well, every committed change), meaning that you can potentially go back in time to a previous version of a project, and see the complete history of a file. This feature is very important: if you accidentally made changes that break your application, or if you deleted a feature you thought you would never need, you can go back to where you were a few hours, a few days, a few months back.Several people can work on the same file.
Gitrelies on a system of branches. Within this branch pattern, there is one main branch, called “main”, which contains the stable, main version of the code-base. By “forking” this branch (or any other branch), developers will have a copy of the base branch, where they can safely work on changing (and breaking) things, without impacting the origin branch. This allows you to try things in a safe environment, without touching what works. Note that simultaneously working on the same file at the same time might not be the perfect practice, it’s better, if possible, to split the code into smaller files.You can safely track changes. Every time a developer records something to
Git, changes are listed. In other words, you can see what changes are made to a specific file in your codebase.It centralizes the codebase. You can use
Gitlocally, but its strength also relies on the ability to synchronize your local project with a distant server. This also means that several people can synchronize with this server and collaborate on a project. That way, changes on a branch on a server can be downloaded (it is calledpullinGitterminology) by all the members of the team, and synchronized locally, i.e. if someone makes changes to a branch and sends them to the main server, all the other developers can retrieve these changes on their machine.
12.1.2 Git basics: add - commit - push - pull
These are the four main actions you will be performing in Git: if you just need to learn the minimum to get started, they are the four essential ones.
add
When using add, you are choosing which elements of your project you want to track, be it new files or modifications of an already versioned file.
This action does not save the file in the Git repository, but flags the changes to be added to the next commit.
commit
A commit is a snapshot of a codebase at a given moment in time.
Each commit is associated with two things: a sha1, which is a unique reference in the history of the project, allowing you to identify this precise state when you need to get back in time, and a message, which is a piece of text that describes the commit.49
Note that messages are mandatory, you cannot commit without them, and that the sha1 references are automatically generated by Git. Do not overlook these messages: they might seem like a constraint at first but they are a life saver when you need to understand the history of a project.
There is no strict rule about what and when to commit. Keep in mind that commits are what allow you to go back in time, so a commit is a complete state of your codebase to which it would make sense to return. A good practice is to state in the commit message which choices you made and why (but not how you implemented these changes), so that other developers (and you in the future) will be able to understand changes. Commit messages are also where you might specify the breaking changes, so that other developers can immediately see these when they are merging your code.
push
Once you have a set of commits ready, you are ready to push it to the server.
In other words, you will permanently record these commits (hence the series of changes) to the server.
Making a push implies three things:
Other people in the team will be able to retrieve the changes you have made.
These changes will be recorded permanently in the project history.
You cannot modify commits once they were sent to the server.50
12.1.3 About branches
Branches are the Git way to organize work and ideas, notably when several people are collaborating on the same project (which might be the case when building large web applications with R).
How does it work? When you start a project, you are in the main branch, which is called the “main”. In a perfect world, you never work directly on this branch: it should always contain a working, deployable version of the application.
Other branches are to be thought of as work areas, where developers fix bugs or add features. The modifications made in these development branches will then be transferred (directly or indirectly) to the main branch. This principle is shown in Figure 12.1.
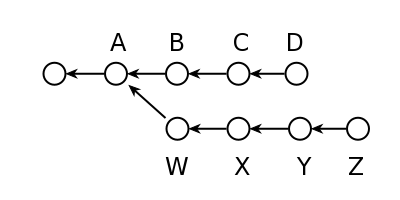
FIGURE 12.1: Branches in Git.
In practice, you might want to use a workflow where each branch is designed to fix a small issue or implement a feature, so that it is easier to separate each small part of the work. Even when working alone.
12.1.4 Issues
If you are working with a remote tool with a graphical interface like GitLab, GitHub or Bitbucket, there is a good chance you will be using issues. Issues are “notes” or “tickets” that can be used to track a bug or to suggest a feature. This tool is crucial when it comes to project management: issues are the perfect spot for organizing and discussing ideas, but also to have an overview of what has been done, what is currently being done, and what is left to be done. Issue may also be used as a discussion medium with beta testers, clients or sponsors.
One other valuable feature of issues is that they can be referenced inside commits using a hashtag and its number: #123.
In other words, when you send code to the centralized server, you can link this code to one or more issues and corresponding commits appear in the issue discussions.
12.2 Git integration
12.2.1 With RStudio
Git is very well integrated in the RStudio IDE, and using Git can be as simple as clicking on a button from time to time.
If you are using RStudio, you will find a pull/push button, a stage and commit interface, and a tool for visualizing differences in files.
Everything you need to get started is there.
Note that of course, it will be better in the long run to get a more complete understanding of how Git works, so that when things get more complexe, you will be able to handle them.
12.2.2 As part of a larger world
Git is not reserved for team work: even if you are working alone on a project, using Git is definitely worth the effort.
Using Git, and particularly issues, helps you organize your train of thought, especially upfront when you need to plan what you will be doing.
And of course, remember that Git is not limited to shiny applications: it can be used for any other R-related projects, and at the end of the day for any code related projects, making it a valuable skill to have in your toolbox, whatever language you will be working with in 10 years!
12.2.3 About git-flow
There are a lot of different ways and methodologies to organize your Git workflow.
One of the most popular ones is called git flow, and we will give you here a quick introduction on how you can manage your work using this approach.
Please note that this is a quick introduction, not a complete guide: we will link to some further reading just at the end of this section.
So, here are the key concepts of git flow:
The
mainbranch only contains stable code: most of the time it matches a tagged, fixed version (v0.0.1, 0.1.0, v1.0.0, etc.). A very small subset of developers involved in the project have writing access to themainbranch, and no developer should ever push code straight to this branch: new code tomainonly comes either from thedevbranch, or from ahotfixbranch. For an app in production, the last commit of this branch should be the version that is currently in production.The
devbranch, on the other hand, is the “Work in progress” branch: the one that contains the latest changes before they are merged into main. This is the common working branch for every developer. Most of the time, developers do not push code into these branches either: they make merge/pull requests (MR/PR) todevfrom afeature branch.A
feature branchis one branch, forked fromdev, that implements one of the features of the application. To keep a clean track of what each branch is doing, a good practice is to useissue-XXX, whereXXXis the corresponding issue you plan to solve in this branch.A
hot fixbranch is a branch to correct a critical issue inmain. It is forked frommain, and is merged straight intomainusing an MR.
A summary of this process is available in Figure 12.2.
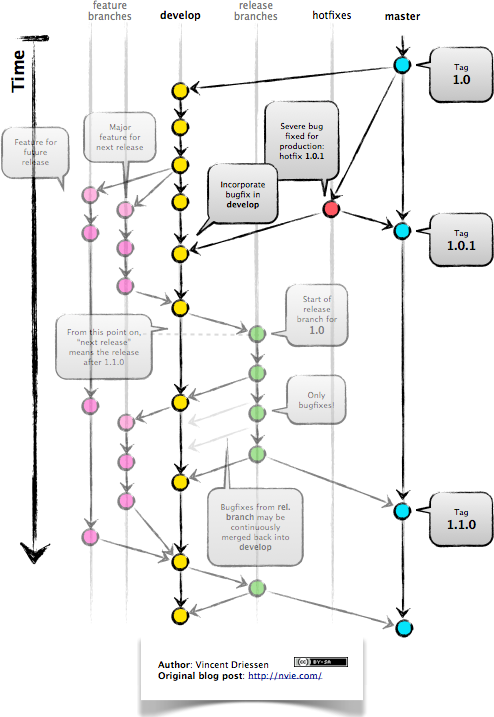
FIGURE 12.2: Presentation of a git flow (Vincent Driessen, http://nvie.com).
From a software engineer point of view, here is how daily work goes:
Identify an issue to work on.
Fork dev into
issue-XXX.Develop a feature inside the branch.
Regularly run
git stash,git rebase dev, andgit stash applyto include the latest changes fromdevto stay synchronized withdev.51Make a pull request to
devso that the feature is included.Once the PR is accepted by the project manager, notify the rest of the team that there have been changes to
dev, so they can rebase it to the branch they are working on.Start working on a new feature.
Of course, there are way more subtleties to this flow of work, but this gives you a good starting point. Generally speaking, good communication between developers is essential for a successful collaborative development project.
12.3 Automated testing
We have seen in Chapter 11 how to build a testing infrastructure for your app, notably using the testthat (Wickham 2023a) package. What we have described is a way to build it locally, before running your test on your own machine. But there is a big flaw to this approach: you have to remember to run the tests, be it regularly or before making a pull request/pushing to the server. To do this kind of job, you will be looking for a tool to do automated testing at the repository level: in other words, a software that can test your application whenever a piece of code is pushed/moved on the repository.
To do this, various tools are available, each with their own features. Here is a non-exhaustive list of the ones you can choose:
Travis CI is a software that can be synced with your Git repositories (GitHub or Bitbucket), and whenever something happens on the repo, the events described in the travis configuration file (.travis.yml) are executed.
If they exit with a code 0, the test passes.
If they do not, the integrated tests have failed.
Travis CI integration may be used internally and externally: internally, in the sense that before merging any pull request, the project manager has access to a series of tests that are automatically launched.
Externally, as a “health check” before installing software: if you visit a GitHub repository that has Travis badges included, you can check if the current state of the package/software is stable, i.e. if it passes the automated tests.
Travis CI can do a lot more than just testing your app: it can be used to build documentation, deploy to production, or to run any other scripts you want to be run before/after the tests have passed. And the nice thing is that you can test for various versions of R, so that you are sure that you are supporting current, future and previous versions of R.
All of this is defined in the .travis.yml file, which is to be put at the root of your source directory, a file that is automatically generated when calling usethis::use_travis().
Note that Travis CI can run tests on GNU/Linux or MacOS operating systems.
Appveyor has the same functionalities as Travis CI. This service can integrate with GitHub, GitHub Enterprise, Bitbucket, GitLab, Azure Repos, Kiln, Gitea. It supports Windows, Linux and macOS.
GitHub actions serve a related purpose: defining actions to be performed as responses to events on the GitHub repository.
Testing, building documentation, push to another repository, deploy on the server—all these actions can be automatically performed.
As with Travis CI, these actions are defined in a yaml file.
Examples of these configurations can be found at r-lib/actions, and some can be automatically linked to your project using functions from usethis: use_github_action_check_release(), use_github_action_check_standard(), use_github_action_check_full() and use_github_action_pr_commands().
The first three perform a standard R CMD check, under various conditions:
- The
releasetests on MacOS, with the latest version of R, and runs the check via the rcmdcheck (Csárdi 2021) package. -
standarddoes the check for 3 operating systems (Windows, Mac and Linux), and for R and R-devel. -
fulldoesstandardbut for the last 5 minor versions of R.
Finally, use_github_action_pr_commands() sets checks to be performed when a pull request is made to the repository.
If you are working with GitLab, you can use the integrated GitLab CI service: it serves the same purpose, with the little difference that it is completely Docker-based: you define a yaml with a series of stages that are performed (concurrently or sequentially), and they are all launched inside a Docker container.
To help you with this, the colinfay/r-ci-tidyverse Docker image comes with pre-installed packages for testing: remotes (Csárdi et al. 2023), testthat (Wickham 2023a), config (Allaire 2020) and is available for several R versions.
This Docker image can be used as the source image for your GitLab CI yaml file.
Here is an example of one of these files:
image: colinfay/r-ci-tidyverse:3.6.0

cache:
  paths:
    - ci/

stages:
  - test
  - document

building:
  stage: test
  script:
    - R -e "remotes::install_deps(dependencies = TRUE)"
    - R -e 'devtools::check()'

documenting:
    stage: document
    allow_failure: true
    when: on_success
    only:
        - main
    script:
        - Rscript -e 'install.packages("DT")'
        - Rscript -e 'covr::gitlab(quiet = FALSE)'
    artifacts:
        paths:
            - public
Automated testing, continuous integration, and continuous deployment are vast topics that cannot be covered in a few pages inside this book, but spending some time learning about these methodologies is definitely worth the time spent: the more you can automate these processes, and the more you test, the more your application will be resilient, easy to maintain, and easy to enhance: the more you check, the quicker you will discover bugs.
And the quicker you detect bugs, the easier it is to correct them!