15 Common Application Caveats
15.1 Reactivity anti-patterns
15.1.1 Reactivity is awesome… until it is not
Let’s face it, reactivity is awesome… until it is not. Reactivity is a common source of confusion for beginners, and a common source of bugs and bottlenecks, even for seasoned shiny developers. Most of the time, issues come from the fact that there is too much reactivity, i.e. we build apps where too many things happen, and some things are updated way more often than they should be, and computations are performed when they should not be, and in the end we have a hard time understanding what is really happening inside our application.
Of course, it is a nice feature to make everything react instantly to changes, but when building larger apps it is easy to create monsters, i.e. complicated, messy, reactive graphs where everything is updated too much and too often. Or worse, we generate endless reactive loops, aka “the reactive inferno” where A invalidates B which invalidates C which invalidates A which invalidates B which invalidates C, and so on.
Let’s take a small example of a reactive inferno:
library(shiny)
library(lubridate)
ui <- function(){
  tagList(
    # Adding a first input which allow
    # to select a specific date
    dateInput(
      "date",
      "choose a date"
    ),
    # Adding a second input allowing
    # to specify a year
    selectInput(
      "year",
      "Choose a year",
      choices = 2010:2030
    )
  )
}

server <- function(
  input,
  output,
  session
){
  # We want the year to be update whenever
  # the dateInput is updated
  observeEvent( input$date , {
    updateSelectInput(
      session,
      "year",
      selected = year(input$date)
    )
  })

  # We want the date to be update whenever
  # the selectInput is updated
  observeEvent( input$year , {
    updateDateInput(
      session,
      "date",
      value = lubridate::as_date(
        sprintf("%s-01-01", input$year)
      )
    )
  })

}

shinyApp(ui, server)
Here, we want to handle something pretty common:
- The user can pick a
dateand theyearinput is updated. - And the other way round: when the
yearinput changes, thedateis updated too.
But if you try to run this in your console, it will end as a reactive inferno: date updates year that updates date that updates year, and so on.
And the more you work on your app, the more complex it gets, and the more you will be likely to end up in a reactive inferno. In this section, we will deal with reactivity, how to have more control over it, and how to share data across modules without relying on passing along reactive objects.
This application is in this state of infinite loop because it starts in a mutually inconsistent state: the dateInput() year value is the current year, while the selectInput() value is 2010.
One way to solve this is to add some extra logic to the app by selecting the current year for selectInput(), and adding an if statement in the observeEvent(input$year, {}), as shown below.59
library(shiny)
ui <- fluidPage(
  dateInput(
    "date",
    "choose a date"
    ),
  selectInput(
    "year",
    "Choose a year",
    choices = 2010:2030,
    # Setting a state for the year
    selected = format(
      Sys.Date(),
      "%Y"
    )
  )
)

server <- function(input, output, session) {
  observeEvent(input$date, {
    year <- format(input$date, "%Y")
    message("Changing year to ", year)
    updateSelectInput(inputId = "year", selected = year)
  })

  observeEvent(input$year, {
    # Preventing this update to be sent at application launch
    if (input$year != format(input$date, "%Y")) {
      date <- as.Date(ISOdate(input$year, 1, 1))
      message("Changing date to ", date)
      updateDateInput(inputId = "date", value = date)
    }
  })
}

shinyApp(ui, server)
15.1.2 observe vs observeEvent
One of the most common features of reactive inferno is the use of observe() in cases where you should use observeEvent.
Spoiler: you should try to use observeEvent() as much as possible, and avoid observe()as much as possible.
At first, observe() seems easier to implement, and feels like a shortcut as you do not have to think about what to react to: everything gets updated without you thinking about it.
But the truth is, this stairway does not lead to heaven.
Let’s stop and think about observe() for a minute.
This function updates every time a reactive object it contains is invalidated.
Yes, this works well if you have a small number of reactive objects in the observer, but that gets tricky when you start adding a long list of things inside your observe(), as you might be launching a computation 10 times if your reactive scope contains 10 reactive objects that are somehow invalidated in chain.
And believe us, we have seen pieces of code where the observe() contains hundreds of lines of code, with reactive objects all over the place, with one observe() context being invalidated dozens of times when one input changes in the application.
For example, let’s start with that:
## DO NOT DO GLOBAL VARIABLES, IT'S JUST TO SIMPLIFY THE EXAMPLE
# We initiate a counter that will help to track how many times
# some pieces of the code are called
i <- 0
library(shiny)
library(cli)
ui <- function(){
  tagList(
    # We are adding a simple text input
    # that will be printed to the console
    textInput("txt", "Text")
  )
}

server <- function(input, output, session){
  observe({
    # Every time this reactive context is invalidated,
    # we add 1 to the i value
    i <<- i + 1
    # We print the i value to the console,
    # and the value of input$txt
    cat_rule(as.character(i))
    print(input$txt)
  })
}

shinyApp(ui, server)
Oh, and then, let’s add a small selectInput():
i <- 0
library(shiny)
library(cli)
ui <- function(){
  tagList(
    # We are adding a simple text input
    # that will be printed to the console
    textInput("txt", "Text"),
    # We add a selectInput() to allow text transformation
    selectInput(
      "casefolding",
      "Casefolding",
      c("lower", "upper")
    )
  )
}

server <- function(input, output, session){
  observe({
    # Every time this reactive context
    # is invalidated, we add 1 to the i value
    i <<- i + 1
    # We print the i value to the console
    cat_rule(as.character(i))
    # If the user select lower, then the text is
    # passed through tolower, otherwise it's passed
    # through toupper
    if (input$casefolding == "lower") {
      print(tolower(input$txt))
    } else  {
      print(toupper(input$txt))
    }
  })
}

shinyApp(ui, server)
And, as time goes by, we add another control flow to our observe():
i <- 0
library(shiny)
library(cli)
library(stringi)
ui <- function(){
  tagList(
    # We are adding a simple text input
    # that will be printed to the console
    textInput("txt", "Text"),
    # We add a selectInput() to allow text transformation
    selectInput(
      "casefolding",
      "Casefolding",
      c("lower", "upper")
    ),
    # A new checkbox to reverse (or not) the input text
    checkboxInput("rev", "reverse")
  )
}

server <- function(input, output, session){
  observe({
    # Every time this reactive context
    # is invalidated, we add 1 to the i value
    i <<- i + 1
    # We print the i value to the console
    cat_rule(as.character(i))
    # Use input_txt as a container for our input
    input_txt <- input$txt
    if (input$rev){
      # If the input$rev is select, we reverse the text
      input_txt <- stri_reverse(input_txt)
    }
    # If the user select lower, then the text is
    # passed through tolower, otherwise it's passed
    # through toupper
    if (input$casefolding == "lower") {
      print(tolower(input_txt))
    } else  {
      print(toupper(input_txt))
    }
  })
}

shinyApp(ui, server)
And it would be nice to keep the selected values in a reactive list, so that we can reuse it elsewhere. And maybe you would like to add a checkbox so that the logs are printed to the console only if checked.
i <- 0
library(shiny)
library(cli)
library(stringi)
ui <- function(){
  tagList(
    # We are adding a simple text input
    # that will be printed to the console
    textInput("txt", "Text"),
    # We add a selectInput() to allow text transformation
    selectInput(
      "casefolding",
      "Casefolding",
      c("lower", "upper")
    ),
    # A new checkbox to reverse (or not) the input text
    checkboxInput("rev", "reverse")
  )
}

server <- function(input, output, session){
  # We are using a reactiveValues to keep this input value
  r <- reactiveValues()
  observe({
    # Every time this reactive context
    # is invalidated, we add 1 to the i value
    i <<- i + 1
    # We print the i value to the console
    cat_rule(as.character(i))
    if (input$rev){
      # If the input$rev is select, we reverse the text
      r$input_txt <- stri_reverse(r$input_txt)
    } else {
      # Otherwise, we leave it as it is
      r$input_txt <- input$txt
    }
    # If the user select lower, then the text is
    # passed through tolower, otherwise it's passed
    # through toupper
    if (input$casefolding == "lower") {
      print(tolower(r$input_txt))
    } else  {
      print(toupper(r$input_txt))
    }
  })
}

shinyApp(ui, server)
Ok, now can you tell how many potential invalidation points we have here?
Three: whenever input$txt, input$rev or input$casefolding change.
Of course, three is not that much, but you get the idea.
Let’s pause a minute and think about why we use observe() here.
To update the values inside r$input_txt, yes.
But do we need to use observe() for, say, updating r$input_txt under dozens of conditions, each time the user types a letter?
Possibly not.
We generally want our observer to update its content under a small, controlled number of inputs, i.e. with a controlled number of invalidation points. And, what we often forget is that users do not type/select correctly on the first try. No, they usually try and miss, restart, change things, amplifying the reactivity “over-happening”.
Moreover, long observe() statements are hard to debug, and they make collaboration harder when the trigger to the observe logic can potentially live anywhere between line one and line 257 of your observe().
That’s why (well, in 99% of cases), it is safer to go with observeEvent, as it allows you to see at a glance the condition under which the content is invalidated and re-evaluated.
Then, if a reactive context is invalidated, you know why.
For example, here is where the reactive invalidation can happen (lines with a *)60:
observe({
    i <<- i + 1
    cat_rule(as.character(i))
*   if (input$rev){
*     r$input_txt <- stri_reverse(r$input_txt)
    } else {
*     r$input_txt <- input$txt
    }
*   if (input$casefolding == "lower") {
*     print(tolower(r$input_txt))
    } else  {
*     print(toupper(r$input_txt))
    }
})
Whereas in this refactored code using observeEvent(), it is easier to identify where the invalidation can happen:
15.1.3 Building triggers and watchers
To prevent this, one way to go is to create “flag” objects, which can be thought of as internal buttons to control what you want to invalidate: you create the button, set some places where you want these buttons to invalidate the context, and finally press these buttons.
These objects are launched with an init function, then these flags are triggered with trigger(), and wherever we want these flags to invalidate a reactive context, we watch() these flags.
The idea here is to get full control over the reactive flow: we only invalidate contexts when we want, making the general flow of the app more predictable. These flags are available using the gargoyle (Fay 2023e) package, that can be installed from GitHub with:
# CRAN version
install.packages("gargoyle")
# Dev version
remotes::install_github("ColinFay/gargoyle")gargoyle::init("this")initiates a"this"flag: most of the time you will be generating them at theapp_server()level.gargoyle::watch("this")sets the flag inside a reactive context, so that it will be invalidated every time youtrigger("this")this flag.gargoyle::trigger("this")triggers the flags.
And, bonus, as these functions use the session object, they are available across all modules.
That also means that you can easily trigger an event inside a module from another one.
This pattern is, for example, implemented in hexmake (Fay 2023g) (though not with gargoyle), where the rendering of the image on the right is fully controlled by the "render" flag.
The idea here is to allow complete control over when the image is recomputed: only when trigger("render") is called does the app regenerate the image, helping us lower the reactivity of the application.
That might seem like a lot of extra work, but that is definitely worth considering in the long run, as it will help in optimizing the rendering (fewer computations), and lowering the number of errors that can result from too much reactivity inside an application.
Here is a small example of this implementation, using an environment to store the value.
When using this pattern, we do not rely on any reactive value invalidating the reactive context: the second result is only displayed when the "render2" flag is triggered, giving us a full control on how the reactivity is propagated.
library(shiny)
library(gargoyle)
ui <- function(){
  fluidPage(
    tagList(
      # Creating an action button to launch the computation
      actionButton("compute", "Compute"),
      # Output for all runif()
      verbatimTextOutput("result"),
      # This output will change only if runif() > 0.5
      verbatimTextOutput("result2"),
      # This button will reset x$results to 0, we use it
      # to show that it won't launch a series of reactivity
      # invalidation
      actionButton("reset", "Reset x")
    )
  )
}

server <- function(
  input,
  output,
  session
){

  # Mimic an R6 class, i.e. a non-reactive object
  x <- environment()

  # Creating two watchers
  init("render_result", "render_result2")

  observeEvent( input$compute , {
    # When the user presses compute, we launch runif()
    x$results <- runif(1)
    # Every time a new value is stored, we render result
    trigger("render_result")
    # Only render the second result if x$results is over 0.5
    if (x$results > 0.5){
      trigger("render_result2")
    }
  })

  output$result <- renderPrint({
    # Will be rendered every time
    watch("render_result")
    # require x$results before rendering the output
    req(x$results)
    x$results
  })


  output$result2 <- renderPrint({
    # This will only be rendered if trigger("render_result2")
    # is called
    watch("render_result2")
    req(x$results)
    x$results
  })

  observeEvent( input$reset , {
    # This resets x$results. This code block is here
    # to show that reactivity is not triggered in this app
    # unless a trigger() is called
    x$results <-  0
    print(x$results)
  })

}

shinyApp(ui, server)
15.1.4 Using R6 as data storage
One pattern we have also been playing with is storing the app business logic inside one or more R6 objects. Why would we want to do that?
A. Sharing data across modules
Sharing an R6 object makes it simpler to create data that are shared across modules, but without the complexity generated by reactive objects, and the instability of using global variables.
Basically, the idea is to hold the whole logic of your data reading/cleaning/processing/outputting inside an R6 class. An object of this class is then initiated at the top level of your application, and you can pass this object to the sub-modules. Of course, this makes even more sense if you are combining it with the trigger/watch pattern from before!
library(shiny)
data_cleaning_ui <- function(id){
  ns <- NS(id)
  tagList(
    # Defining the UI for your first module
    # [...]
  )
}

mod_data_cleaning_server <- function(id, r6){
  moduleServer( id, function(input, output, session){
    ns <- session$ns
    observeEvent( input$launch_cleaning , {
      # Once the launch_cleaning input is triggered, we
      # use the internal method from our r6 object
      r6$clean(arg1 = input$a, arg2 = input$b)
      # Triggering the plot
      trigger("plot")
    })
  })
}

plotting_ui <- function(id){
  ns <- NS(id)
  tagList(
    # Defining the UI for your second module
    # [...]
  )
}

mod_plotting_server <- function(id, r6){
  moduleServer( id, function(input, output, session){
    ns <- session$ns
    # Rendering, inside this second module, the plot based on the
    # cleaning done in the other module
    output$plot <- renderPlot({
      # We use the trigger/watch pattern from before
      watch("plot")
      # Calling the plot() method from our R6 object
      r6$plot()
    })
  })
}


ui <- function(){
  tagList(
    # Putting our two module UIs here
    data_cleaning_ui("data_cleaning_ui"),
    plotting_ui("plotting_ui")
  )
}

server <- function(
  input,
  output,
  session
){
  # We start by creating a new instance of th
  r6 <- MyDataProcessing$new()
  # Passing this object to the two server functions
  mod_data_cleaning_server("data_cleaning_ui_1", r6)
  mod_plotting_server("plotting_ui_1", r6)

}

shinyApp(ui, server)
B. Be sure it is tested
During the process of building a robust shiny app, we strongly suggest that you test as many things as you can. This is where using an R6 for the business logic of your app makes sense: this allows you to build the whole testing of your application data logic outside of any reactive context: you simply build unit tests just as any other function.
For example, let’s say we have the following R6 generator:
MyData <- R6::R6Class(
  "MyData",
  # Defining our public methods, that will be
  # the dataset container, and a summary function
  public = list(
    data = NULL,
    initialize = function(data){
      self$data <- data
    },
    summarize = function(){
      summary(self$data)
    }
  )
)
We can then build a test for this class using testthat:
library(testthat, warn.conflicts = FALSE)
test_that("R6 Class works", {
  # We define a new instance of this class, that will contain
  # the mtcars data.frame
  my_data <- MyData$new(mtcars)
  # We will expect my_data to have two classes:
  # "MyData" and "R6"
  expect_is(my_data, "MyData")
  expect_is(my_data, "R6")
  # And the summarize method to return a table
  expect_is(my_data$summarize(), "table")
  # We would expect the data contained in the object
  # to match the one taken as input to new()
  expect_equal(my_data$data, mtcars)
  # And the summarize method to be equal to the summary()
  #  on the input object
  expect_equal(my_data$summarize(), summary(mtcars))
})
Test passed 🌈Using R6 allows to rely on these battle-tested tools when it comes to testing functions, something which is made more complex when using other patterns like reactiveValues().
15.1.5 Logging reactivity with {whereami}
Getting a good sense of how reactivity is actually working in your app is not an easy task: the reactivity logic is a graph, and it happens very quickly when you run the app, so it’s very hard to follow everything.
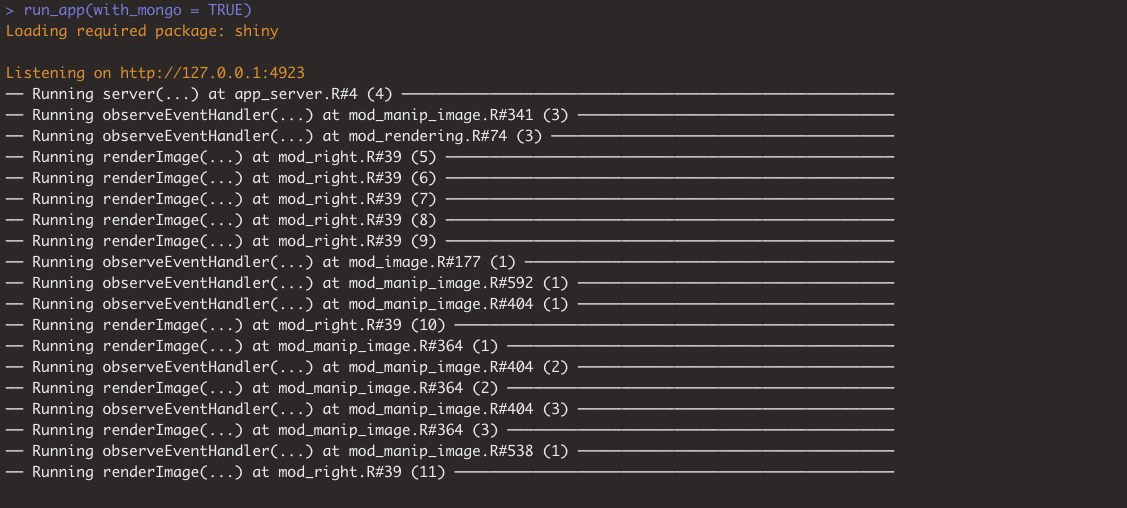
whereami::whereami()’s (Sidi and Müller 2022) goal is simple: informing you about where it is called, i.e. from what file and at which line, and how many times.
For example, if you add the following piece of code to your app_server(), the location of the function call will be printed to the logs.
── Running server(...) at app_server.R#9 (2) ───────────────Combining cat_where() will implement a reactive logging to your console while developing: that way, you can instantaneously know what reactive contexts are invalidated while using the application.
Of course, you still have to implement it by hand, but that is definitely worth the effort: seeing in real time, in your console, which line is run allows you to detect unexpected behavior.
For example, you will be able to see that the observeEvent() from mod_main.R#79 has been called 17 times when launching the app, which might be an unexpected behavior.
The screenshot in Figure 15.1 shows what a whereami log might look like, here, for the hexmake application.
And bonus, once the app is closed, you can get a list of all the “counters” with whereami::counter_get(), and how many times they each have been called, and plot(whereami::counter_get()) will draw a raw plot of the various counters, as shown in Figure 15.2.
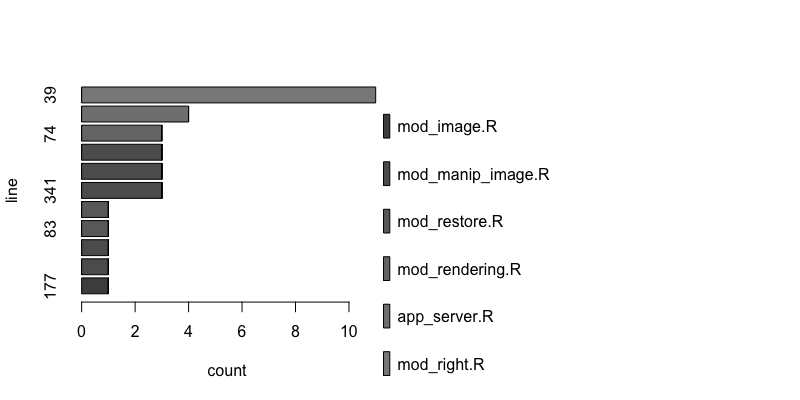
FIGURE 15.2: plot of whereami counters.
15.2 R does too much
15.2.1 Rendering the UI from the server side
There are many reasons we would want to change things on the UI based on what happens in the server: changing the choices of a selectInput() based on the columns of a table which is uploaded by the user, showing and hiding pieces of the app according to an environment variable, allowing the user to create an indeterminate number of inputs, etc.
Chances are that to do that, you have been using the uiOutput() and renderUI() functions from shiny (Chang et al. 2022).
Even if convenient, and the functions of choice in some specific context, this pair of functions makes R do a little bit too much: you are making R regenerate the whole UI component instead of changing only what you need, which can be a suboptimal, be it from the user point of view, or from a developer perspective.
One of the instance in which this pattern might not be optimal is in the case where your visitors do not have an high-speed internet or when visiting and using a smartphone, contexts where every byte counts. Rendering large elements from the server side in your shiny app means that these elements will have to transit through the socket, i.e. they need to be sent by the server, and downloaded by the browser. In this case, the smaller the message size the better!
From the developer perspective, you will create code that is harder to reason about, as we are used to having the UI parts in the UI functions (but that is not related to performance).
Here are three strategies to code without uiOutput() and renderUI().
A. Implement UI events in JavaScript
Mixing languages is better than writing everything in one, if and only if using only that one is likely to overcomplicate the program.
The Art of UNIX Programming (Raymond 2003)
We will see in the last chapter of this book how you can integrate JS inside your shiny app, and how even basic functions can be useful for making your app server smaller. For example, compare:
library(shiny)
ui <- function(){
  tagList(
    # Adding a button with an onclick event,
    # that will show or hide the plot
    actionButton(
      "change",
      "show/hide graph",
      # The toggle() function hide or show the queried element
      onclick = "$('#plot').toggle()"
    ),
    plotOutput("plot")
  )
}

server <- function(
  input,
  output,
  session
){
  output$plot <- renderPlot({
    # This renderPlot will only be called once
    cli::cat_rule("Rendering plot")
    plot(iris)
  })
}

shinyApp(ui, server)
to
library(shiny)
ui <- function(){
  tagList(
    # We use a pattern without JavaScript
    actionButton("change", "show/hide graph"),
    plotOutput("plot")
  )
}

server <- function(
  input,
  output,
  session
){

  output$plot <- renderPlot({
    # Here, every time the button is clicked, this reactive
    # context will be invalidated, and the code re-evaluated
    cli::cat_rule("Rendering plot")
    # Simulate a show and hide pattern
    req(input$change %% 2 == 0)
    plot(iris)
  })

}

shinyApp(ui, server)
The result is the same, but the first version is shorter and easier to understand: we have one button, and the behavior of the button is self-contained.
The second solution redraws the plot every time the reactiveValues is updated, making R compute way more than it should, whereas with the JavaScript-only solution, the plot is not recomputed every time you need to show it: the plot is drawn by R only once.
At a local level, the improvements described in this section will not make your application way faster: for example, rendering UI elements (let’s say rendering a simple title) will not be computationally heavy. But at a global level, less UI computation from the server side helps the general rendering of the app: let’s say you have an output that takes 3 seconds to run, then if the whole UI + output is to be rendered on the server side, the whole UI stays blank until everything is computed.
Compare:
library(shiny)
ui <- function(){
  tagList(
    # We make the whole UI be generated by R
    uiOutput("caption")
  )
}

server <- function(
  input,
  output,
  session
){
  output$caption <- renderUI({
    # Simulate something that takes 3 seconds to run
    Sys.sleep(3)
    # Returning the UI
    tagList(
      h3("test"),
      shinipsum::random_text(10)
    )

  })
}

shinyApp(ui, server)
to
library(shiny)
ui <- function(){
  tagList(
    # Only the text input will be rendered by R
    h3("test"),
    textOutput("caption")
  )
}

server <- function(
  input,
  output,
  session
){
  output$caption <- renderText({
    # Here, we only render the text, not the whole UI
    Sys.sleep(3)
    shinipsum::random_text(10)
  })
}

shinyApp(ui, server)
In the first example, the UI will wait for the server to have rendered, while in the second we will first see the title, then the rendered text after a few seconds. That approach makes the user experience better: they know that something is happening, while a completely blank page is confusing.
Also, because R is single threaded, manipulating DOM elements from the server side causes R to be busy doing these DOM manipulations while it could be computing something else. And let’s imagine it takes a quarter of a second to render the DOM element. That is a full second for rendering four of them, while R should be busy doing something else!
B. update* inputs
Almost every shiny input, even the custom ones from packages, come with an update_ function that allows us to change the input values from the server side, instead of re-creating the UI entirely.
For example, here is a way to update the content of a selectInput from the server side:
library(shiny)
ui <- function(){
  tagList(
    # We start the selectInput empty
    selectInput("species", "Species", choices = NULL),
    # The selectInput will be populate
    # when the update button is pressed
    actionButton("update", "Update")
  )
}

server <- function(
  input,
  output,
  session
){
  observeEvent( input$update , {
    # Update the selectInput with the species from iris
    spc <- unique(iris$Species)
    updateSelectInput(
      session,
      "species",
      choices = spc,
      selected = spc[1]
    )
  })

}

shinyApp(ui, server)
This switch to updateSelectInput makes the code easier to reason about as the selectInput is where it should be: inside the UI, instead of another pattern where we would use renderUI() and uiOutput().
Plus, with the update method, we are only changing what is needed, not re-generating the whole input.
C. insertUI and removeUI
Another way to dynamically change what is in the UI is with insertUI() and removeUI().
It is more global than the solution we have seen before with setting the reactiveValue to NULL or to a value, as it allows us to target a larger UI element: we can insert or remove the whole input, instead of having the DOM element inserted but empty.
This method allows us to have a smaller DOM: <div> that are not rendered are not generated empty, they are simply not there.
Two things to note concerning this method, though:
- Removing an element from the app will not delete the input from the input list. In other words, if you have
selectInput("x", "x"), and you remove this input usingremoveUI(), you will still haveinput$xin the server.
For example, in the following example, the input$val value will not be removed once you have called removeUI(selector = "#val").
library(shiny)
ui <- function(){
  tagList(
    # Creating a text input that will be removed
    #  from the UI whenever the remove button is pressed
    textInput("value", "Value", "place"),
    actionButton("remove", "Remove UI")
  )
}

server <- function(
  input,
  output,
  session
){

  observeEvent( input$remove , {
    # When the button is pressed,
    #  the textInput will be removed from the UI
    removeUI(selector = "#value")
  })

  observe({
    # We observe input$value every second.
    # You'll realize that even after the UI
    # is removed, input$value is still available.
    invalidateLater(1000)
    print(input$value)
  })

}

shinyApp(ui, server)- Both these functions take a
jQueryselector to select the element in the UI. We will introduce these selectors in Chapter 17.
15.2.2 Too much data in memory
If you are building a shiny application, there is a great chance you are building it to analyze data. If you are dealing with large datasets, you should consider deporting the data handling and computation to an external database system: for example, to an SQL database. Why? Because these systems have been created to handle and manipulate data on disk: in other words, it will allow you to perform operations on your data without having to clutter R memory with a large dataset.
For example, if you have a selectInput() that is used to perform a filter on a dataset, you can do that filter straight inside SQL, instead of bringing all the data to R and then doing the filter.
That is even more necessary if you are building the app for a large number of users: for example if one shiny session takes up to 300MB, multiply that by the number of users that will need one session, and you will have a rough estimate of how much RAM you will need.
On the contrary, if you reduce the data manipulation so that it is done by the back-end, you will have, let’s say, one database with 300MB of data, so the database size will remain (more or less constant), and the only RAM used by shiny will be the data manipulation, not the data storage.
That’s even more true now that almost any operation you can do today in dplyr (Wickham, François, et al. 2023) would be doable with an SQL back-end, and that is the purpose of the dbplyr (Wickham, Girlich, and Ruiz 2023) package: translates dplyr code into SQL.
If using a database as a back-end seems a little bit far-fetched right now, that is how it is done in most programming languages: if you are building a web app with NodeJS or Python for example, and need to interact with data, nothing will be stored in RAM: you will be relying on an external database to store your data. Then your application will be used to make queries to this database back-end.
15.3 Reading data
shiny applications are a tool of choice when it comes to analyzing data. But that also means that these data have to be imported/read at some point in time, and reading data can be time consuming. How can we optimize that? In this section, we will take a look at three strategies: including datasets inside your application, using R packages for fast data reading, and when and why you should move to an external database system.
15.3.1 Including data in your application
If you are building your application using the golem (Fay, Guyader, Rochette, et al. 2023) framework, you are building your application as a package. R packages provide a way to include internal datasets, which can then be used as objects inside your app. This is the solution you should go for if your data are never to rarely updated: the datasets are created during package development, then included inside the build of your package. The plus side of this approach is that it makes the data fast to read, as they are serialized as R native objects.
To include data inside your application, you can use the usethis::use_data_raw( name = "my_dataset", open = FALSE ) command, which is inside the 02_dev.R script inside the dev/ folder of your source application (if you are building the app with golem).
This will create a folder called data-raw at the root of your application folder, with a script to prepare your dataset.
Here, you can read the data, modify it if necessary, and then save it with usethis::use_data(my_dataset).
Once this is done, you will have access to the my_dataset object inside your application.
This is, for example, what is done in the tidytuesday201942 (Fay 2023l) application, in data-raw/big_epa_cars.R: the CSV data are read there, and then used as an internal dataset inside the application.
15.3.2 Reading external datasets
Other applications use data that are not available at build time: they are created to analyze data that are uploaded by users, or maybe they are fetched from an external service while using the app (for example, by calling an API).
When you are building an application for the “user data” use case, the first thing you will need is to provide users a way to upload their dataset: shiny::fileInput().
One crucial thing to keep in mind when it comes to using user-uploaded files is that you have to be (very) strict with the way you handle files:
- Always specify what type of file you want:
shiny::fileInput()has anacceptparameter that allows you to set one or more MIME types or extensions. When using this argument (for example, withtext/csv,.csv, or.xlsx), the user will only be able to select a subset of files from their computer: the ones that match the type. - Always perform checks once the file is uploaded, even more if it is tabular data: column type, naming, empty rows, etc. The more you check the file for potential errors, the less your application is likely to fail to analyze this uploaded dataset.
- If the data reading takes a while, do not forget to add a visual progression cue: a
shiny::withProgress()or tools from the{waiter}package.
Whenever you offer a user the possibility to upload anything, you can be sure that at some point, they will upload a file that will make the app crash. By setting a specific MIME type and by doing a series of checks once the file is uploaded, you will make your application more stable. Finally, having a visual cue that “something is happening” is very important for the user experience, because “something is happening” is better than not knowing what is happening, and it may also prevent the user from clicking again and again on the upload button, or worse, they will stop using the app.
Now that we have our fileInput() set, how do we read these data as fast as possible?
There are several options depending on the type of data you are reading.
Here are some packages that can make the file reading faster:
- For a tabular, flat dataset (typically csv, tsv, or text), vroom (Hester, Wickham, and Bryan 2023) can read data at a 1.40 GB/sec speed. The
fread()function from data.table (Dowle and Srinivasan 2023) is also fast at reading delimited files. - For JSON files, jsonlite (Ooms 2014). Or more recently,
{RcppSimdJSON}(Eddelbuettel, Knapp, and Lemire 2023), which is a binding to thesimdjsonC++ library. - If you need to read Excel files inside your app, readxl (Wickham and Bryan 2023) offers a binding to the
RapidXMLC++ library, which reads Excel files fast. - Most files exported from statistical software (SAS, SPSS, etc.) can be read using either the foreign (R Core Team 2022) or haven (Wickham, Miller, and Smith 2023) packages.
15.3.3 Using external databases
Another type of data analyzed in a shiny application is data that is contained inside an external database. Databases are heavily used in the data science world and in software engineering as a whole. Databases come with APIs and drivers that help retrieve and transfer data: be it SQL, NoSQL, or even a graph.
Using a database is one of the solutions for making your app smaller and more efficient in the long run, especially if you need to scale your app to thousands of visitors. Indeed, if you plan on having your app scale to numerous people, that will mean that a lot of R processes will be triggered. And if your data is contained in your app, this will mean that each R process will take a significant amount of RAM if the dataset is large. For example, if your dataset alone takes ~300 MB of RAM, that means that if you want to launch the app 10 times, you will need ~3GB of RAM. On the other hand, if you decide to switch these data to an external database, it will lower the global RAM need: the DB will take these 300MB of data, and each shiny application will make a request to the database. For instance, if the database needs 300MB, and one shiny app 50MB, then 10 apps will be 300MB (for the DB) + 50MB * 10 (for the 10 apps). In practice, other things are to be considered: making database requests can be computationally expensive, and might need some network adjustments, but you get the idea.
How does one choose between database back-end?
Well, first of all you need to see what is available in the environment the application will be deployed: maybe the company you are building the application for already has database servers deployed.
If ever you are free to choose any database as a back-end, your choice should be driven by what kind of operations you want to make on these databases.
For example, SQL databases are designed to store tabular data, and they tend to be very fast when it comes to reading data: so if you have one or more large data.frames you want to use inside your application, and with no specific update of these data, an SQL back-end can be the perfect choice.
On the other hand, a NoSQL database like MongoDB will be faster when it comes to doing write operations, and can store any kind of object: for example, hexmake can use a MongoDB back-end to store RDS files.
But that comes with a price: read calls are a little bit slower, and you might have to work a little bit more on handling the JSON results that come out of MongoDB.
Another example of an app that uses on an external database is {databasedemo}, available at engineering-shiny.org/databasedemo/.
Feel free to follow this link for more information about this application!
Covering all the available types of databases and the packages associated with each is a very, very large topic: there are dozens of database systems, and as many (if not more) packages to interact with them. For more extensive coverage of using databases in R, please follow these resources:
Databases using R, the official RStudio documentation around databases and R.
colinfay/r-db, a Docker image that bundles the toolchain for a lot of database systems for R.
CRAN Task View: Databases with R: the official task view from CRAN with a series of packages for database manipulation